December 24, 2014

December 12, 2014

Holiday Mobile 2014 - Hourglass Tetrahedron Style

How do chainmaille-holics decorate for the holidays?  What trinkets do we use?  Something with jump rings, of course!! :-)


These are two half-fist size Hourglass Tetrahedrons, adorned with colorful scales, hanging off a little mobile hook.  Aren't they cute?!  I think they look like little poinsettias almost ready to bloom, with the scales as leaves right below...  Do you see it? :-)  So what are they not red and green?  Orange and teal are their close relatives, or is it more like next door neighbors?  That will do just fine in my book!


Happy Holidays, everyone!!

....

Lorenz's Forget-Me-Not Bracelet


How does one forget anything this gorgeous?


This fluid...


Even in the littlest detail...


Well, one does not EVER!!


A special order from a special person!  So grateful for Manola's trust and support of my work.  Next up in the series of Forget-Me-Not, finger ring!!!


Interested in one of these as well?  I'll be happy to custom make one for you!  Just drop me a note in the Contact Form; be sure to include the name "Forget-Me-Not Bracelet" in the description.

Thanks so much for visiting!

♥.....OoOOoOOoOOo....♥

...


November 26, 2014

Broomstick Lace Scarf - My 4th :-)

Have I mentioned I want to learn to knit and crochet?  Well, winter is usually a good time to pick them up :-)

Here's what I learned last month while surfing the net.  Broomstick Lace crochet.


So light and airy!  And the opening loops remind me of chainmaille Mobius weave.  Wondering if there's a way to combine the two....  ??  That'd be some very interesting texture, huh?  :-)

...,.

November 23, 2014

Pet Dragon Key Chain - in Purple and Black


Took me quite a while to get this new baby ready for its new home :-)


 Sporting beautiful violet purple and black, mixed with indigo and silver, this is a most handsome fella I've ever seen ;-)


Snuggling in my hand, the little dragon takes a nap before getting on its homeward trip!

Oh, how I'll miss you........


Specs update

Since my first chainmaille dragon, I've gone thru many, many ounces of stainless steel jump rings, from several different vendors, over quite a few orders.  Interestingly, the jump rings from the same vendor under the same material code comes out slightly different in size!  This is the one aspect that baffles plenty beginning maillers :-(

Of course, these jump rings are handmade too!  Sure, they mostly are made with some kind of machines/tools.  But the winding and cutting are still all made in individual batches.  All of these result in variations in the end.

What's more, my techniques in closing the rings, different pliers, modified construction steps, all of these factors add to very interesting results.

The original specs list 3 sizes of rings: 1/8", 5/32", and 3/16".  Boy, that was a tough one, with 3/16" stainless steel rings in some very tight spots... oy!

I now switched out some 3/16" with 13/64" on half of the HP3in1, plus a couple of 1/4" for sideburns.  And the tail gets 4 sizes of rings for a more gradual slim-down.  As for the neck connection, I skip a couple of rings so the head can move more freely.  Well, who knows what I'll come up with next time....  It's this never-ending process that makes chainmaille so fascinating, and addictive ;-)


For a sneak peek of the listing for this handsome dude, please visit my online studio DaisyKreates.  Interested in having a brand new dragon made just for you, please visit this listing.

September 13, 2014

R&D - Some More Ring Cutting, Why Not?

This summer flew by fast before I realized it's almost gone.  I didn't maille much; just some experiments here and there; those were fun!

But I know there are quite a number of projects on my to-do list, waiting for me to get started.  Well, to be exact, they're waiting for the jump rings to be ready, namely several different sizes of niobium rings.  Time to cut some rings!!  Nothing like firing up a few power tools to get things going fast :-)

The first batch:  Some niobium rings in 1.3 mm wire, 1/4" ID, for a custom order of a Forget-Me-Not bracelet.

Yes, I'm starting from scratch, I mean, raw niobium wire, that is :-)  17 gauge SWG, at 1.3 mm thick, 20 feet long, just under 2.5 oz.  Power winding in 4 batches onto 1/4" transfer punch.


Yes, I know there are the messy over coiling on the ends.  They used to bother me a lot... Not any more; don't sweat the small stuff, I was told!

Here's why having a Ringinator is a major plus:  Cut off the messy ends, run the good coils through the ring cutter. And in no time, you get this!


Well, there were a few more steps in between... like washing, tumbling, sifting thru the stainless steel shots, and 2 rounds of QC: first one to separate the obvious scraps; second to pick out the defects, like over- or under-cuts, non-circulars, severely bruised, etc.  See the pile of short coils and squigglies?  I used to labor over a hand saw for hours on end (felt like it...) trying to recover them; not anymore; they go into other future projects and experiments!

Then I'm left with the pile on the right, 170+ nice, clean cut jump rings, ready to go.  As to the middle 5 rings, they are randomly picked out, properly closed to be measured for the actual ID entered on my spreadsheet.  Yes, good documentation is not only a virtue, it's a necessity, for a complicated computer system, as well as a lovely handmade chainmaille bracelet!


What have I learned from this batch of rings?  Mind the direction when winding wire.  Noticed the two rings above have different handedness?  The right-handed ring on the left, and the left-handed ring on the right.  Do they make any difference in the end product?  For the majority of weaves, probably not.  But I'll admit, having consistent ring handedness does seem to contribute to a smooth flow of hand movement during weaving.

What do you think?  Have you noticed any advantage or disadvantage in using mixed handedness of rings?  Or am I over analyzing and missing the fun?  LOL!

Next step in prep:  Add some colors!  Stay tuned ;-)


July 31, 2014

Chainmaille Owl Pendant

After the previous post on my original chainmaille owlet design, I've been asked why that owl looks different than the ones we often see in paintings and movies...  Well, I suppose that's because they were inspired by the three baby barn owls on Cornell Lab's bird cams.

Barn owls don't have ear tufts.  That's why:-)

Now, what if I add a couple of more rings here and there, to highlight the ear tufts, and add depth to the eyes, wonder how that might change the overall impression?


Better now? :-)

Incidentally, this is also a bigger owl, about 1 1/4" across and 1 1/8" tall.  I bumped up the sizes of all rings, and switched all bright aluminum rings to stainless steel for a better weight, which took me much longer than making the whole owl pendant, oy......

Or, should it be "screechhhhh"?  LOL!!!


\V/
@;@
/((___))\
++

...

July 15, 2014

My New Owlet Design

To celebrate the successful fledging of all three owlets at Cornell Lab's Bird Cam, I'm happy to announce the birth of my new chainmaille owlet design!!


It's been a long while since I first started sketching my owlet design.  It had gone from way big, to way complicated, some were too heavy, or too difficult to repeat, .... I looked at many other fellow maillers designs, and there are quite a few excellent ones ....

But it's not until I started following the three little owlets on the web cam, that I had a much better look at their body, the shape, the way they tilt their heads, move their eyes, flap their wings, preening one another, all kinds of antics, that I finally settled on this much stylized design.


Yes, this little guy's eyes, wings, and feet can all move freely, which was an important part of my "design requirement" :-)  I want it to be a "lively" creation, not so much a sculpture.

What do you think?  Maybe a pair of earrings to match?? ;-)

Update, July 16, 2014

It's been suggested to me that I should introduce you to the web cam darling owlets that inspired this chainmaille owlet design; so here they are!!


Aren't they just absolutely adorable?! ♥♥♥

\/
oo
((O))
;;

~~~~~

July 1, 2014

A Dragon is Born!

Hey there!!


What's up? :-)


What's new?!


Coming down my hand for a visit?!


Or, maybe just one more snooze :-)


Now, a good stretch...................


OK, ready?  Go!! :-)

So happy for this little one; it had just arrived at its new home with Roland!  Have fun, guys!!

Each of my chainmaille dragons is custom made to order (like this one) with all saw cut stainless steel jump rings to ensure its long term durability, so it can accompany you on lots and lots of fantastic adventures!! :D


..............................................

June 27, 2014

Silver Blue Ghenghiz Cohen Bracelet

A while back, I made a silver-gold tone Ghenghiz Cohen bracelet with bright aluminum and jewelry brass rings, and it was very pretty, plus the weight was just right, not too light, not too heavy.  Although it often was mistaken for a couple of other weaves, like Orbital Berus, Vertebrae, even Garter Belt...  All from the Euro family, but each with its own unique pattern!

Recently, I received a request from a visitor to my online store to make one of these bracelets but in silver and blue.  Not the typical dark blues which are popular with chainmaille work, but a medium to lighter shade of blue, such as aqua or turquoise.  Lucky for me and my customer, Blue Buddha has these prettiest turquoise blue rings in anodized aluminum, and in the exact size for this weave too!!


Isn't this gorgeous?!


These anodized aluminum rings are slightly larger in diameter than the jewelry brass rings that I used in my original piece.  That's why you see a clearer pattern here.


I continue the same toggle design for the closure as well as it offers a simple and smooth transition without much interruption in the weave pattern.


So happy I was able to complete this bracelet in time for all the fun activities that Manola has in plan for the summer!!

7 1/2" long, 5/8" wide, and 3/8" thick, fairly light weight considering its presence:-)

Complete views of the bracelet available here.

Want one of these for a loved one or yourself?  I'll be happy to make you one (or two ;-) in your color choice(s), just check it out in my online studio and let me know your color options.

...@@@@@@@...


June 14, 2014

Japanese Polyhedron Nox Earrings - A Stargate-Inspired Chainmaille Creation

The other day, I was going through my long list of to-do's and one item sticks out again and again is "make more Japanese polyhedron earrings", with a big star marked right next to the note.  Hum....  right, I've always liked the architectural flair of this weave, can be elongated and soft, or very squarish and sturdy, it is fun and sprite-like, versatile and charismatic, shall we have a pair of these in shiny sterling?  With some colorful highlights, maybe?


These may look like the ones I made before, but this new design is a very tight and sturdy structure, each forming a bipyramid of sterling silver on the outer rim and natural titanium on the interior rim, held together closely with rainbow anodized niobium rings.


Oh yes, I made the niobium rings myself from raw wire, they're hand coiled, anodized with multiple colors, cut on my Ringinator, then tumbled to clean up the burs and residues from the cutting process.


I then painstakingly built the bipyramid shape with several different pliers, because the rings interaction was so tight, the sequence of weaving matters a lot.  A missed step often means a marred ring that had to be tossed and replaced :-(


But the results are very satisfying!!  My favorite is the way you can see through the polyhedron to take in the views and colors on the far side!  How neat is that?!

Oh and yes, the long, wing-like dangles are the result of an afternoon of moping around, thinking, sketching, testing, nearly giving up a few times, going back on the net surfing for ideas, heading out to the back yard watching hummingbirds zooming through my patio chasing one another..... then, a light bulb came on:-)

And I'm very happy with them!


These colorful and whimsical earrings are also available for purchase in my online studio.


~~~~~ So, why "Nox"? ~~~~~

Well, the fact that I made these on a Sunday afternoon may have something to do with it...  You see, I have a habit of catching the reruns of Stargate SG-1 on TV:-)  No, the Nox episode wasn't on any specific Sunday, but as I was watching the show and doing my "user testing" on these earrings, the way they swing, I see the shiny rings flicker on and off, echoing the little bling on the dangle, they all reminded me of the Nox.  Hence, the name!!


June 4, 2014

Oops Chainmaille Finger Ring in Rainbow Anodized Niobium

Took me long enough to finally finish this ring!!


Do you remember the coil of pure niobium from last post?  Right, that's what went into this finger ring :-)


6 rows high, 22 columns around, several anodizing dips from 15 volt to 107, zipped up end to end, and voila!


Niobium gives out brilliant colors without etching, is hypoallergenic, super friendly for the majority of the skin sensitivity.  I specially like using it in chainmaille for its relatively harder temper and nice medium weight.

Did I mention I like colors? (hee hee...)


This baby belongs to my dear friend Joy M.  Think I'll be making more of these, because it's so ..... 
what's the word?

Addictive!  LOL!


.......

June 2, 2014

R&D - More Cutting Rings by Hand

As I work on a custom order of a niobium chainmaille finger ring, I thought it's about time I document the process of going from wires to chains.  This is how I first started doing chainmaille back in 2008.  Lots have changed since then.  Now we have many excellent sources specializing in chainmaille supplies.  But once in a while, I enjoy going back to the way it had all started.  So, here it is!

I'm making a Oops finger ring in pure niobium, based on this ring:


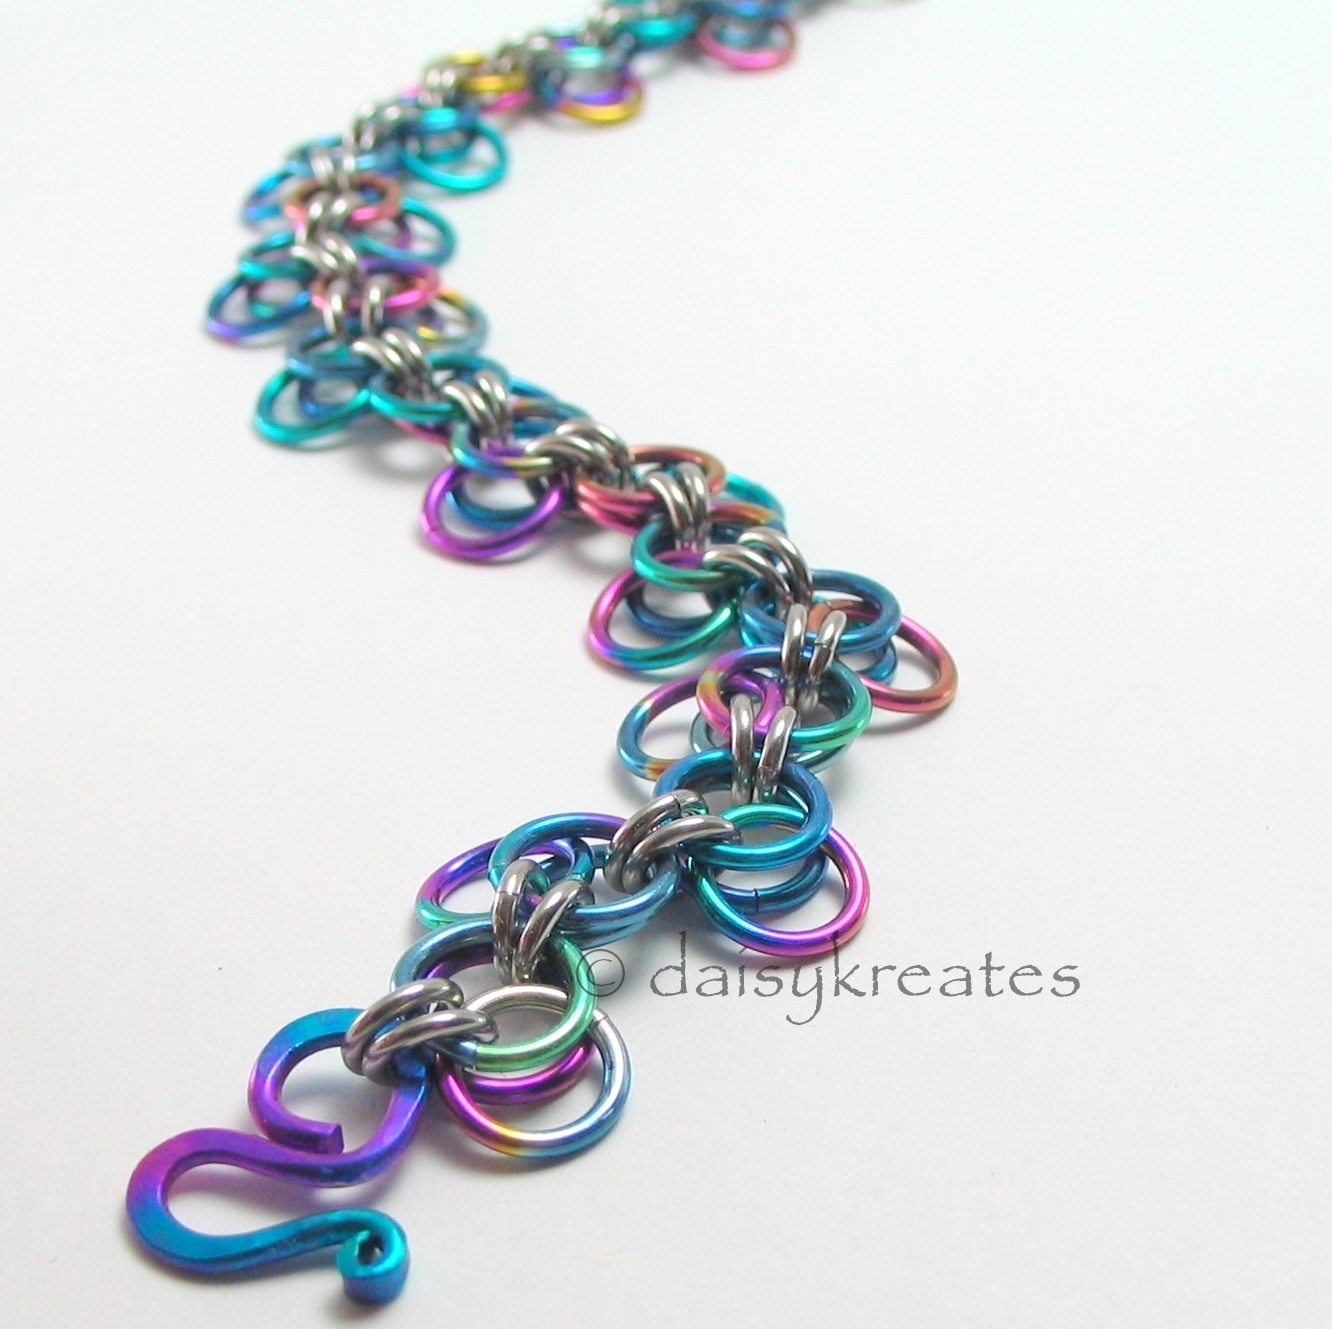
 A chainmaille Oops ring in 20 gauge AWG sterling silver.  This one was picked up by my old friend Mary S. :-)  A little more about it in this post here.

This time, my friend Joy M., who's my partner-in-crime from two of my previous lives, wants one of these in anodized niobium to match her bracelet and earrings.  So here it goes!

I start with a bundle of niobium wire.


Cut a length of this wire; I cut about 98".  btw, I use memory wire cutter; don't use your fancy flush cutters for silver or copper; niobium will chew them right up.

Coil tightly on a 7/64" mandrel, I get two coils, each looking like this.


I learned to cut coils by wrapping masking tape around it, put it onto a saw blade, then saw cut from the inside.  This cutting method was introduced in a free tutorial written by Carolyn Allan on JewelryLessons.com long time ago; it's no longer available on that site; but I've been faithfully following her method.


I load the blade cut side facing downward towards my right hand.  Start cutting from inside the coil like this:


I like to draw a straight line on the masking tape just as a visual guide for the blade.  Then cut steadily, keeping the blade to the top of coil, aim for the first 4 or 5 rings.  For this length of coil, it took me about 20 minutes to cut through; the last few coils tend to be problematic; they can be cut, but will take more effort; I mostly leave them out and save them for other projects:


Open the masking tape, and I get these:


A whole coil of rings, neatly open up in a long roll:-)  The masking tape also helps catching most of the metal filing inside, that's a good thing for my lungs!  Oh right, I use Bur Life on both the coil and the blade, re-apply liberally.  Niobium gets warm very fast, seems more so than most other metals I've cut...

Open up the coil and let out the rings! Yay!!


I carefully pick them up and put into a small jar 1/3 filled with water, tiny drop of Sunsheen burnishing fluid, some stainless steel shots, then shake!


Shake shake shake!  Shake shake shake! :-)

This cleans the rings, knocks off small burs from the cut.


It's a little hard to see in this photo, but in that murky water are all the loose stuff that I don't want on the rings.  I pour the water out in the backyard at a spot where I don't plant anything.  Careful not to lose the rings or the shots:-)  According to Rio Grande's data sheet on Sunsheen, it's biodegradable.  I just don't want the metal bits accumulating in my kitchen drain.

Now we get the rings, nice and clean, ready to go!!


Not sure if you can see them, but I coiled these the "wrong" way, which makes them "left-handed", meaning the left side of the ring is closer to me when I hold up a ring with cut end facing up.


Nothing really "wrong" about them, but many maillers reported right-handed folks work better with right-handed rings when it comes to threading them into a weave, specially in tight spots.  I'm right handed, but I'll take them anyway they come :-)

So, this is just an example of how I make a small batch of rings by hand.  If it seems tedious, then making rings is probably not your thing, LOL!  I quite like it; there's a zen to it that helps me focus.

Here is after they're added to the Oops weave; it's almost there... !


Oh and yes, those are two pairs of my favorite pliers, Xuron 475.  My go-to pliers about 80% of the time!!

Whew, this is a long post for me!  But it's well worth it, even for myself!

Glad you stopped by!

ooooooo
ooooo
ooo