Showing posts with label handmade chainmaille. Show all posts

January 27, 2015

Pet Dragon with School Color

I'm not a sports fan, never paid much attention to school colors either; but I recently noticed a lot of them chose maroon!  Interesting!  Never thought of this seasonal, somewhat muted color would be so popular among school teams.


Any how, I received a request to make a pet dragon key fob with maroon color scales.  Well, in our chainmaille world, we just call this color "burgundy" :-)  and many thanks to C&T Designs for supplying these fabulous scales!!


This handsome dragon takes after its older siblings in not only being totally awesome,


but super adorable too ;-)


Want one of these cuties with your school colors?  Please visit my online studio for ordering details.

Click here for more views.

~*~*~*~*~*~
...

July 1, 2014

A Dragon is Born!

Hey there!!


What's up? :-)


What's new?!


Coming down my hand for a visit?!


Or, maybe just one more snooze :-)


Now, a good stretch...................


OK, ready?  Go!! :-)

So happy for this little one; it had just arrived at its new home with Roland!  Have fun, guys!!

Each of my chainmaille dragons is custom made to order (like this one) with all saw cut stainless steel jump rings to ensure its long term durability, so it can accompany you on lots and lots of fantastic adventures!! :D


..............................................

June 4, 2014

Oops Chainmaille Finger Ring in Rainbow Anodized Niobium

Took me long enough to finally finish this ring!!


Do you remember the coil of pure niobium from last post?  Right, that's what went into this finger ring :-)


6 rows high, 22 columns around, several anodizing dips from 15 volt to 107, zipped up end to end, and voila!


Niobium gives out brilliant colors without etching, is hypoallergenic, super friendly for the majority of the skin sensitivity.  I specially like using it in chainmaille for its relatively harder temper and nice medium weight.

Did I mention I like colors? (hee hee...)


This baby belongs to my dear friend Joy M.  Think I'll be making more of these, because it's so ..... 
what's the word?

Addictive!  LOL!


.......

February 28, 2014

Two Genie Bottles in Classic Golden Mulberry

The smaller, more dainty one, in my original design.


Then the bigger, more showy one, in the second incarnation of my genie bottle design.


Both custom made for my friend Etsuko, in the same color scheme of golden mulberry that is most reminiscent of the "I Dream of Jeannie" bottle.

While I have created quite a few chainmaille genie bottles in lots of color combos, each time I completed one of these beauties, I still find myself falling in love with it all over again!


I wish I had one photo of these two side by side, so you may see how they are similar "and" different...  The next best thing, how about these two photos side by side?

I used the same colors and sizes of AA rings to weave the Whirlybirds, but in different number of rings.  Interesting to see the dramatic changes in the final sizes.

Over the time as I've experimented with incorporating other elements, such as beads, chains, wires, into my chainmaille pieces, one thing becomes clear:  Multimedia is much more than just the materials; it is even more about the techniques, and knowing when to use which material, what technique for their unique qualities and best contribution to the overall design.  Right, so glad that all the time I spent on bead-weaving and wire-wrapping, plus several other more :-) is now coming together nicely.  It's the quickening!!

For complete views of these two pieces, please check them out in
here and here.

.
V
<>
((()))
::
;;
;
*
...

December 3, 2013

Sterling Silver and Niobium - Chainmaille Mobius - Tea Rose Earrings

Yes, that's a mouthful of a name for a simple pair of earrings.  Blame it on SEO....  :-)  Any who, here they are!


Believe me this simple version is a long way coming from many experiments of regular mobius, with dozens of rings, or way too many colors.


Weeding out the extraneous is a delicate dance.  I want brilliant colors that work together, enough punch that catches attention, and the right highlights that twinkle with any hair style.


And yes, even the ear wires are coordinated!


And the result is an understated elegance, with a modern twist on the good old mobius weave.


These ready-to-bloom purple fuchsia tea roses are available for purchase in my online studio DaisyKreates.com:-)

***

Due to costs, I don't regularly stock precious metal items in multiples.  If you'd like to purchase this item but happened to find it sold already, please drop me a note via the "Contact Form" located in the upper right portion of this blog, or via the "Contact" button in my online studio DaisyKreates.com; I'll be happy to arrange a custom order of this item for you.


:::

November 17, 2013

Another Squarish-Looking Hanging Thingy


Yes, that's the little brother of my first Japanese 8 in 2 Captive 1 (J8in2C1) in blue fade.

This time, I used anodized aluminum (AA) rings with bright aluminum (BA) as captives.  Same general specs as last one, but the aspect ratios (AR's) are slightly different.

Several things to keep in mind when switching materials:

1.  The wire diameter (WD) can vary from vendor to vendor, even from batch to batch depending on when the rings were acquired.

2.  The WD of AA can be very, very different depending on the colors; yes, even from the same vendor, the same batch; this happens to even the best vendors.  My guess is it has to do with the anodizing process of aluminum, how much of the material is eaten away in order for the different pigments to enter and adhere to the voids in the metal.

3.  Well, this one you maillers out there all know already, the inside diameter (ID) changes greatly from metal to metal; the harder temper ones have greater spring back, giving bigger ID, therefore, bigger AR; and this really throws up the overall structures!!

4.  At the beginning of these shapes, the captive rings tend to pop out when I'm not looking.  Felt like I was constantly running after that escaped ring for both of these projects...  I'd imagine it may help by adding a piece of thin gauge wire to temporarily hold the first few squares together, kind of like using a piece of wire to start those pesky Half Persian weaves.


5.  At last, but not least, the whole square will get tighter and tighter as you go.  Much like many other chainmaille sculptures, the last few rings can make the toughest guys cry....  Well, not me!!  I cheated a little by slightly folding the square to make the last few connections, sort of like "folding the space", ya know;-)  Hee hee, does this sound geeky?  But you get what I mean:-)


Any how, the results are very satisfying!  I think I'll make a few more of these, maybe one in each color!

Yay!!!

...

November 12, 2013

Holiday Trinket 2013 in Japanese 8 in 2 Captive 1


Yes, I know the closures on this are rather embarrassing, but I'm so very happy that I finally, finally, (wait, wait for this....) learn how to read "Maillese", that's if that is a word, or a language:-)

Japanese 8 in 2 Captive 1 is a weave that I had wanted to do almost from day one when I started mailling, because ....  well, it looked easy enough, and yet so pretty.

Well, that was over 4 years ago.  I tried many times; none worked; googled all over; no samples.  The most recent attempt was about 6 months ago; failed.  I gave up.

Then, I saw this discussion by CMB on MAIL.  OMG!!  What can I say?  If only I learned how to "read"!  I totally misunderstood what the "Captive" means......  so sad:-(

OK, so this is what I made last night; a shameless copy of Zlosk's weave entry, along with my WIP photos.


et, voila!


It's looking so, so pretty!!  And feels nice too with the weight of the stainless steel and bronze rings in a very rigid form.

Specs are exactly as what CMB said in the discussion thread: stainless steel 18 swg, 3/16" and bronze 18 swg, 1/4".  But I think I made the mistakes in using saw cut rings, which looked to be little smaller AR than the machine cut rings.  I absolutely did not "mind the gaps", LOL!!

These sure make very pretty holiday trinkets, don't you think? :-)

btw, I also made a little sibling for this trinket; wanna see?  Come over here.

More pix?  Please visit my Picasa web album.

#
#  #
#    #
#  #
#

...

October 24, 2013

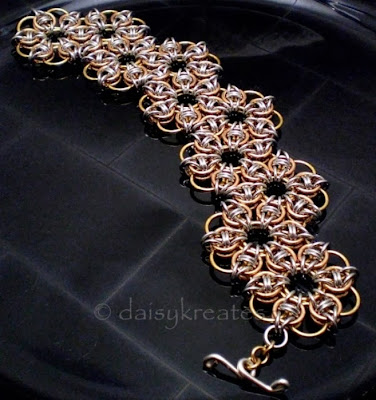
Celtic Rose Sheet Bracelet in Hexagonal Tessellation


I just realized that I've not recorded my Celtic Rose Hex Sheet bracelet in my blog yet!  Guess I was too excited (and exhausted) when I finally got done with it:-)


I made this for one of the 2012 weave challenges on MWW, which I really enjoyed immensely.  Not that I made it through every one of them, but I did try my best, and I learned quite a bit.


So, this lacy little weave, Celtic Rose Sheet Hexagonal Tessellation, wasn't too difficult to make.  The key is to understand where the connection points are from one "rose unit" to the next.  I'm a bit more "free" when it comes to the ring sizes, I noticed that so long as I can fit the small ring just inside of a medium ring, the rest was more or less "negotiable".  It may also helped when I gave up on actually making a sheet which could be more daunting than a straight bracelet form, more or less:-)


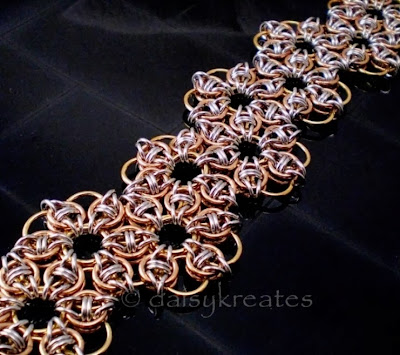
btw, this is not exactly my first try at the weave.  Below is my first try:


I actually like this color contrasts better, a more distinct, tri-color look; but the large copper rings are wee bit too large, making the units a little floppy; also with copper rings at such high AR, they are kind of weak, and that is not a good thing.....

Comparing to the final ring combination here:


So much more better, right?  Hee hee:-)


And it lays nicely on the wrist with a low profile, very form-fitting, closes with a handmade toggle bar connecting to the last rose unit on the other end of the bracelet, making the whole thing almost seamless.


In case anyone is interested, here's what I used: JB 18swg 5/16", Bronze 18swg 7/32", BA 19swg 5/32".

Or, skip the DIY steps, just come over to my online studio DaisyKreates.com and pick this one up for yourself, or your loved one!  Easy, peasy:-)  In case of sold-out and you'd still like one made by me, please drop me a note for a custom made piece just for you :-)


:*:*:*:

October 21, 2013

One More Night at Denny's


Ha ha ha, yup, one more of these pretty little bracelets, One Night at Denny's!


This one is for my dear friend Margaret's mom's upcoming birthday celebration.


Selected by Margaret's two boys, the original version was a rather jingly one, with lots of bells, and it went to my friend Sara.  Now Sara is always ready for her next belly dancing party:-)


Margaret likes this bracelet for her mom with beads instead of bells.  Equally colorful and eye-catching, but much more quiet....


What do you think?  Comments/critiques welcome!!

I think I will make another one, this time with rings more inline with BrassAnvil's original specs on M.A.I.L., I like the contrasts between the different gauges of rings, and the way it gladly welcomes any beads, bells, charms, dangles, etc. along with the fun!!

...

September 4, 2013

Lorenz's Forget-Me-Not Earrings

Made these earrings as a special order for my dear friend Kathy, who already bought a pair of these for herself earlier this year; now getting another pair for her sister.


I'm so glad I have the opportunity to come back to this weave after more than two years ago when I first learned it.  So simple, so cute!  Lots of ways to expand on these.   


Compared to the original weave, I'm hanging these upside down, seems more natural this way for earrings.


One of these days, I'll make a pair with the petals going the right way, upward, that is:-)


Incidentally, I hand saw these niobium rings with a 4/o saw blade.  I wasn't too sure if these blades will work on 17 swg coils; the wire is 1.31 mm.  Well, as you can see, it did work, not very difficult at all.

Couple of things worth noting:

1. I used Rio Grande's Burr Life liberally on the blade, and it cuts much better than all my previously improvised lubricants.  Burr Life, good stuff to have.

2. Niobium gets warm rather quickly when worked on, this includes when being forged and being cut.  I could feel the temperature warming up thru the masking tape around the coil....


It's always a good day when I learn something new:-)

   
....