December 31, 2013

Sterling Silver Squiggle Adjustable Ring


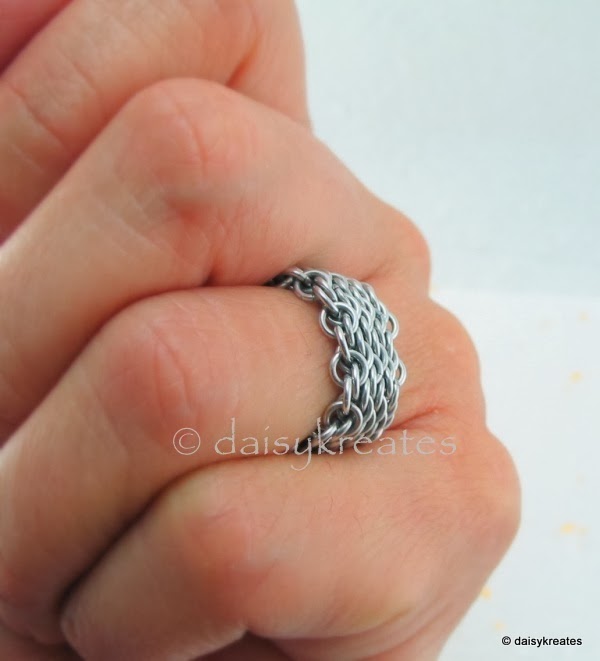
Squiggly, wiggly!  Free form and adjustable!


Fits on ring finger just as well as on pinkie.


Open ended design for easy adjustments.


Tapered back for comfortable wear without worry of ring slipping off accidentally.


Hammered surface with micro facets catching light all around it...


Oh so shiny:-)


Weights at 0.11 troy ounce, fits ring sizes 6 1/4 to 7.  All 925 sterling silver, all hand forged, no two are exactly alike.

Pick this one up in my online studio DaisyKreates.com now!

December 19, 2013

Oops Chainmaille Finger Ring


Soft, very tactile and conforming, yet strong and durable!


I have long favored Oops as my number one weave when it comes to making a chainmaille ring most representative of the unique quality of maille.


Yes, that's over 180 tiny little jump rings, opened and closed by me, with my trusted pairs of Xuron pliers, until my fingers and wrists are exhausted, eyes crossed....


No, this is not the most ring hungry project, but it is my pride and joy for the neatly lined up pattern and perfectly balanced weight distribution!  Not many other chainmaille finger rings offer such strength as well as a low profile.


Fingers itchy for a DIY?  Other than joining the ends, this is not a difficult one to make, just rather time consuming.  These are all bright aluminum rings in 20 awg, 3/32" ID.  Have fun!


More pix?  Visit this photo album!

::::

December 15, 2013

Chainmaille Temari Pendants


I think of these as my chainmaille Temari pendants, although the die-hard maillers would perhaps insist on their technical name: Japanese Dodecahedron 10 in 3.


In any case, one thing is true:
These little balls are totally addictive!!


There is never making just one of them...


Difficult for me to use only one color; must mix them up a bit:-)


OK, so maybe just one of these in a single color... How about blue?  Very cool color, blue, that is, with a little on the indigo side... and a little on the purple side:-)


Seriously, isn't this so much more interesting than just the same shade of blue? :-)


I like using the color rings for the surface layer of the sphere, and the bright aluminum rings on the outer connections; the colors stay protected from wear, while the shiny silvery rings bring out the highlights, and echo the reflection from the glass marble in the center of the ball.


Strung on 24" smooth rubber cord, 2mm thick, closes with a dainty sterling silver clasp, the Temari pendant is just a little over 1" in diameter, perfect size for everything in your wardrobe!!

These cute chainmaille Temari ball necklaces are now available for purchase in my online studio DaisyKreates.com.  Thinking about different color combinations?  How about dropping me a note in the "Contact Form" to arrange for a custom order?!

More views of the necklace available in my Picasa Web album.

.....

December 5, 2013

How Many Genies Bottles??


Um, not sure, I lost count after 3 ......  Here are some of them...


... from my 2013 collection.

and there were more that I didn't get to photograph before they were "adopted":-)  Let's me think, there were purple, yellow, rainbow, ....

and a few more that have been waiting for their close-ups for a while: chocolate brown, caramel, mint green, peacock feather ....

looks like the photographer (that would be me...) has been the bottle neck, pun intended.... :-)

Hum, as I write this post, one of these babies is claimed...  Hard to keep up!  To custom order your very own, please drop me a note via Contact Me at my online studio DaisyKreates.com.


\/   \/   \/   \/
<> <> <> <>
::(): :(): :(): :()::

December 4, 2013

Emerald Green Genie Bottle Pendant

Green is not an easy color to photograph, this I learned from the pictures of my Emerald Green Genie Bottle Pendant.


I so hope your monitor/screen shows coloration similar to mine, as my camera and I sure tried our best to deliver the closest emerald green here as on the actual genie bottle.


And I was lucky enough to have found the vintage Swarovski Margarita 16-petal crystal also in emerald green to complete this beautiful genie bottle in a true monochromatic color scheme.


BTW, did you know that emerald also happens to be the birthstone of May?! ....  You're welcome:-)


Never the ordinary.


Be extraordinary.  Be the magic.


To custom order this necklace, please Contact Me at my online studio DaisyKreates.com.

Visit my online album for complete views of the emerald green genie bottle necklace.

Thank you for visiting!!

December 3, 2013

Sterling Silver and Niobium - Chainmaille Mobius - Tea Rose Earrings

Yes, that's a mouthful of a name for a simple pair of earrings.  Blame it on SEO....  :-)  Any who, here they are!


Believe me this simple version is a long way coming from many experiments of regular mobius, with dozens of rings, or way too many colors.


Weeding out the extraneous is a delicate dance.  I want brilliant colors that work together, enough punch that catches attention, and the right highlights that twinkle with any hair style.


And yes, even the ear wires are coordinated!


And the result is an understated elegance, with a modern twist on the good old mobius weave.


These ready-to-bloom purple fuchsia tea roses are available for purchase in my online studio DaisyKreates.com:-)

***

Due to costs, I don't regularly stock precious metal items in multiples.  If you'd like to purchase this item but happened to find it sold already, please drop me a note via the "Contact Form" located in the upper right portion of this blog, or via the "Contact" button in my online studio DaisyKreates.com; I'll be happy to arrange a custom order of this item for you.


:::

December 2, 2013

Solar Eclipse Bracelet in Stainless Steel


Solar Eclipse is a weave I've wanted to make since back in 2010 when I first saw it on MWW.


Such a clever pattern, pleasant simplicity, and lots and lots of options when it comes ring sizes to use.


In choosing the big rings for this bracelet, I did go one size larger than what's in the weave description on MAIL.  And for this reason, I picked stainless steel which will offer a stable shape and firm hold on the kerf closures.


Speaking of closure, I did fuss over what type, what material, what shape, ... etc, etc.  Felt like the closure selection took longer than making the whole bracelet... oy!

As you can see, I finally settled on a simple, handmade (to be specific, "my hand", that is:-)) niobium toggle bar.  I think closures are just as important, if not more, as the main part of the jewelry.  They should take a stand on either being part of the overall presentation, or be the focal point.  In either case, it should not be an after thought; or in this case, I did think about it after I finished the chain, but to my defense, lots of thoughts were put into the final decision to make sure the bracelet looks good and wears well!!


For you DIYers who'd like to try their hands on this, here are my stats for this Solar Eclipse: 16swg, 7/16", 5/16", and 18swg, 3/16", all stainless steel, all saw cut.

Like this a lot but don't feel like DIY?  This bracelet is available for purchase thru my online studio DaisyKreates.com.  Hope to see you there!!

@-=@-=@-=@

...

November 17, 2013

Another Squarish-Looking Hanging Thingy


Yes, that's the little brother of my first Japanese 8 in 2 Captive 1 (J8in2C1) in blue fade.

This time, I used anodized aluminum (AA) rings with bright aluminum (BA) as captives.  Same general specs as last one, but the aspect ratios (AR's) are slightly different.

Several things to keep in mind when switching materials:

1.  The wire diameter (WD) can vary from vendor to vendor, even from batch to batch depending on when the rings were acquired.

2.  The WD of AA can be very, very different depending on the colors; yes, even from the same vendor, the same batch; this happens to even the best vendors.  My guess is it has to do with the anodizing process of aluminum, how much of the material is eaten away in order for the different pigments to enter and adhere to the voids in the metal.

3.  Well, this one you maillers out there all know already, the inside diameter (ID) changes greatly from metal to metal; the harder temper ones have greater spring back, giving bigger ID, therefore, bigger AR; and this really throws up the overall structures!!

4.  At the beginning of these shapes, the captive rings tend to pop out when I'm not looking.  Felt like I was constantly running after that escaped ring for both of these projects...  I'd imagine it may help by adding a piece of thin gauge wire to temporarily hold the first few squares together, kind of like using a piece of wire to start those pesky Half Persian weaves.


5.  At last, but not least, the whole square will get tighter and tighter as you go.  Much like many other chainmaille sculptures, the last few rings can make the toughest guys cry....  Well, not me!!  I cheated a little by slightly folding the square to make the last few connections, sort of like "folding the space", ya know;-)  Hee hee, does this sound geeky?  But you get what I mean:-)


Any how, the results are very satisfying!  I think I'll make a few more of these, maybe one in each color!

Yay!!!

...

November 12, 2013

Holiday Trinket 2013 in Japanese 8 in 2 Captive 1


Yes, I know the closures on this are rather embarrassing, but I'm so very happy that I finally, finally, (wait, wait for this....) learn how to read "Maillese", that's if that is a word, or a language:-)

Japanese 8 in 2 Captive 1 is a weave that I had wanted to do almost from day one when I started mailling, because ....  well, it looked easy enough, and yet so pretty.

Well, that was over 4 years ago.  I tried many times; none worked; googled all over; no samples.  The most recent attempt was about 6 months ago; failed.  I gave up.

Then, I saw this discussion by CMB on MAIL.  OMG!!  What can I say?  If only I learned how to "read"!  I totally misunderstood what the "Captive" means......  so sad:-(

OK, so this is what I made last night; a shameless copy of Zlosk's weave entry, along with my WIP photos.


et, voila!


It's looking so, so pretty!!  And feels nice too with the weight of the stainless steel and bronze rings in a very rigid form.

Specs are exactly as what CMB said in the discussion thread: stainless steel 18 swg, 3/16" and bronze 18 swg, 1/4".  But I think I made the mistakes in using saw cut rings, which looked to be little smaller AR than the machine cut rings.  I absolutely did not "mind the gaps", LOL!!

These sure make very pretty holiday trinkets, don't you think? :-)

btw, I also made a little sibling for this trinket; wanna see?  Come over here.

More pix?  Please visit my Picasa web album.

#
#  #
#    #
#  #
#

...

October 31, 2013

Japanese Dodecaheron Chainmaille Cufflinks


I've been wanting to make these cuff links for a while.... ever since I saw the beautiful cuff links by Corvus in sterling silver.  Very inspired!!

So I thought, what can I do to give my cuff links a little something extra, something to set them apart from the traditional style, like this?


Well, I didn't come up with much... it's hard to improve upon perfection, which the Japanese Dodcahedron is as far as sphere shape goes.  As you can see, and I hope you agree, the little spunky cuff link is already beyond adorable.

So, if there's not much I can add in the front, how about the back, huh?


I'm a big fan of tassels:-)  Anything that swings, moves, with some sparkles, something shiny!

I like these the best in that the tassels are optional.  You can wear the cuff links with or without the tassels.  Yes, I'm all for having options:-)

Traditional.


Or.... a little extra!!


Your choice!!

These lovely cufflinks are now available in my online studio DaisyKreates.com.  Hope you'll come by for a visit.

As for you DIYers out there, I used the fabulous square wire rings 20-C from C and T Designs for the Japanese balls, with a 6 mm Swarovski #5040 inside to plump it up.  Now you know:-)

Thank you for stopping by my blog!  Would love to hear from ya!!

....