Showing posts with label Niobium. Show all posts

September 13, 2014

R&D - Some More Ring Cutting, Why Not?

This summer flew by fast before I realized it's almost gone.  I didn't maille much; just some experiments here and there; those were fun!

But I know there are quite a number of projects on my to-do list, waiting for me to get started.  Well, to be exact, they're waiting for the jump rings to be ready, namely several different sizes of niobium rings.  Time to cut some rings!!  Nothing like firing up a few power tools to get things going fast :-)

The first batch:  Some niobium rings in 1.3 mm wire, 1/4" ID, for a custom order of a Forget-Me-Not bracelet.

Yes, I'm starting from scratch, I mean, raw niobium wire, that is :-)  17 gauge SWG, at 1.3 mm thick, 20 feet long, just under 2.5 oz.  Power winding in 4 batches onto 1/4" transfer punch.


Yes, I know there are the messy over coiling on the ends.  They used to bother me a lot... Not any more; don't sweat the small stuff, I was told!

Here's why having a Ringinator is a major plus:  Cut off the messy ends, run the good coils through the ring cutter. And in no time, you get this!


Well, there were a few more steps in between... like washing, tumbling, sifting thru the stainless steel shots, and 2 rounds of QC: first one to separate the obvious scraps; second to pick out the defects, like over- or under-cuts, non-circulars, severely bruised, etc.  See the pile of short coils and squigglies?  I used to labor over a hand saw for hours on end (felt like it...) trying to recover them; not anymore; they go into other future projects and experiments!

Then I'm left with the pile on the right, 170+ nice, clean cut jump rings, ready to go.  As to the middle 5 rings, they are randomly picked out, properly closed to be measured for the actual ID entered on my spreadsheet.  Yes, good documentation is not only a virtue, it's a necessity, for a complicated computer system, as well as a lovely handmade chainmaille bracelet!


What have I learned from this batch of rings?  Mind the direction when winding wire.  Noticed the two rings above have different handedness?  The right-handed ring on the left, and the left-handed ring on the right.  Do they make any difference in the end product?  For the majority of weaves, probably not.  But I'll admit, having consistent ring handedness does seem to contribute to a smooth flow of hand movement during weaving.

What do you think?  Have you noticed any advantage or disadvantage in using mixed handedness of rings?  Or am I over analyzing and missing the fun?  LOL!

Next step in prep:  Add some colors!  Stay tuned ;-)


June 2, 2014

R&D - More Cutting Rings by Hand

As I work on a custom order of a niobium chainmaille finger ring, I thought it's about time I document the process of going from wires to chains.  This is how I first started doing chainmaille back in 2008.  Lots have changed since then.  Now we have many excellent sources specializing in chainmaille supplies.  But once in a while, I enjoy going back to the way it had all started.  So, here it is!

I'm making a Oops finger ring in pure niobium, based on this ring:


 A chainmaille Oops ring in 20 gauge AWG sterling silver.  This one was picked up by my old friend Mary S. :-)  A little more about it in this post here.

This time, my friend Joy M., who's my partner-in-crime from two of my previous lives, wants one of these in anodized niobium to match her bracelet and earrings.  So here it goes!

I start with a bundle of niobium wire.


Cut a length of this wire; I cut about 98".  btw, I use memory wire cutter; don't use your fancy flush cutters for silver or copper; niobium will chew them right up.

Coil tightly on a 7/64" mandrel, I get two coils, each looking like this.


I learned to cut coils by wrapping masking tape around it, put it onto a saw blade, then saw cut from the inside.  This cutting method was introduced in a free tutorial written by Carolyn Allan on JewelryLessons.com long time ago; it's no longer available on that site; but I've been faithfully following her method.


I load the blade cut side facing downward towards my right hand.  Start cutting from inside the coil like this:


I like to draw a straight line on the masking tape just as a visual guide for the blade.  Then cut steadily, keeping the blade to the top of coil, aim for the first 4 or 5 rings.  For this length of coil, it took me about 20 minutes to cut through; the last few coils tend to be problematic; they can be cut, but will take more effort; I mostly leave them out and save them for other projects:


Open the masking tape, and I get these:


A whole coil of rings, neatly open up in a long roll:-)  The masking tape also helps catching most of the metal filing inside, that's a good thing for my lungs!  Oh right, I use Bur Life on both the coil and the blade, re-apply liberally.  Niobium gets warm very fast, seems more so than most other metals I've cut...

Open up the coil and let out the rings! Yay!!


I carefully pick them up and put into a small jar 1/3 filled with water, tiny drop of Sunsheen burnishing fluid, some stainless steel shots, then shake!


Shake shake shake!  Shake shake shake! :-)

This cleans the rings, knocks off small burs from the cut.


It's a little hard to see in this photo, but in that murky water are all the loose stuff that I don't want on the rings.  I pour the water out in the backyard at a spot where I don't plant anything.  Careful not to lose the rings or the shots:-)  According to Rio Grande's data sheet on Sunsheen, it's biodegradable.  I just don't want the metal bits accumulating in my kitchen drain.

Now we get the rings, nice and clean, ready to go!!


Not sure if you can see them, but I coiled these the "wrong" way, which makes them "left-handed", meaning the left side of the ring is closer to me when I hold up a ring with cut end facing up.


Nothing really "wrong" about them, but many maillers reported right-handed folks work better with right-handed rings when it comes to threading them into a weave, specially in tight spots.  I'm right handed, but I'll take them anyway they come :-)

So, this is just an example of how I make a small batch of rings by hand.  If it seems tedious, then making rings is probably not your thing, LOL!  I quite like it; there's a zen to it that helps me focus.

Here is after they're added to the Oops weave; it's almost there... !


Oh and yes, those are two pairs of my favorite pliers, Xuron 475.  My go-to pliers about 80% of the time!!

Whew, this is a long post for me!  But it's well worth it, even for myself!

Glad you stopped by!

ooooooo
ooooo
ooo

May 28, 2014

R&D - Saw-Cut Niobium Rings

This is something I had wanted to do even before I got my Ringinator :D

Specs

Niobium (yes, my favorite metal), 20 gauge AWG, half-hard, 0.2 oz, 144 coils on 3/32" mandrel, quick dips 3 times in anodizing bath, voltage 102, 85, 60, run thru Ringinator on 0.010" blade, with only soapy water and Rio Grande's Bur Life stick, loose rings anodized again at 35 volt for cut ends.


Counted 96 good ones.  Not bad for a first try.

What have I learned?
  1. Get some real cutting fluid for the Ringinator.  Niobium loads up very fast on the blade, even at this thin gauge...
  2. When cut by hand with a jeweler's saw, 8/o blades will do.  But do it in short coils, wrapped in masking tape; they heat up fast!
  3. Use low speed on the drill.  Gauge for gauge, temper for temper, niobium is harder to cut than bronze or sterling silver.
  4. Up the last anodizing voltage before cutting, to above 63, maybe, so that the final dip after cutting have more choices.
  5. For large volume of rings in common sizes, it's still more economical to buy them!!
I thoroughly enjoyed this experiment, and will definitely do it again.

What do you think? ;-)

.......


December 2, 2013

Solar Eclipse Bracelet in Stainless Steel


Solar Eclipse is a weave I've wanted to make since back in 2010 when I first saw it on MWW.


Such a clever pattern, pleasant simplicity, and lots and lots of options when it comes ring sizes to use.


In choosing the big rings for this bracelet, I did go one size larger than what's in the weave description on MAIL.  And for this reason, I picked stainless steel which will offer a stable shape and firm hold on the kerf closures.


Speaking of closure, I did fuss over what type, what material, what shape, ... etc, etc.  Felt like the closure selection took longer than making the whole bracelet... oy!

As you can see, I finally settled on a simple, handmade (to be specific, "my hand", that is:-)) niobium toggle bar.  I think closures are just as important, if not more, as the main part of the jewelry.  They should take a stand on either being part of the overall presentation, or be the focal point.  In either case, it should not be an after thought; or in this case, I did think about it after I finished the chain, but to my defense, lots of thoughts were put into the final decision to make sure the bracelet looks good and wears well!!


For you DIYers who'd like to try their hands on this, here are my stats for this Solar Eclipse: 16swg, 7/16", 5/16", and 18swg, 3/16", all stainless steel, all saw cut.

Like this a lot but don't feel like DIY?  This bracelet is available for purchase thru my online studio DaisyKreates.com.  Hope to see you there!!

@-=@-=@-=@

...

May 1, 2013

Blue Daisies Earrings with Color Coordinated Niobium Ear Wires


These blue daisies are not only bright and cheery, they are on a pair of handcrafted niobium ear wires of matching colors!


I made the pair of ear wires out of natural niobium wire, with added scrolls at front for some extra flair, shortened tail ends at the back for comfort wear, and then anodized the pair in two of the high voltage colors in the reflective spectrum: hot pink and teal blue, making them perfect for the big purple rings and the teal blue daisy beads.


These earrings are light weight, great for everyday wear; thanks to the niobium ear wires, they are hypoallergenic and will not irritate even the most sensitive ear lopes:-)


The Blue Daisies earrings measure at 2 1/2 inches long, 1/2 inch wide, weighs at a mere 0.1 oz.


Haven't tried niobium yet?  Wondering what it is?  Here's a little intro to this semi-precious metal.

~~~~~~~~~~~~~~~~ About Niobium ~~~~~~~~~~~~~~~~

Niobium is a natural material, element number 41 on the periodic table. The color of unanodized niobium is a warm, dark gray. When anodized, a layer of skin forms on the metal surface and reflects colors of the spectrum depending on the thickness of the layer.

Natural niobium requires no maintenance, will not change state or tarnish in our natural environment, hypoallergenic even for those with most skin sensitivity. It has been my favorite metal to use in handmade jewelry.


This item is available for custom order in my ArtFire studio.  Customizations welcome.

S
O
||
o
||
o
||
o
*
...


May 23, 2012

Tripoli Triangle Bracelet

Took me quite a while, but it's well worth it...........


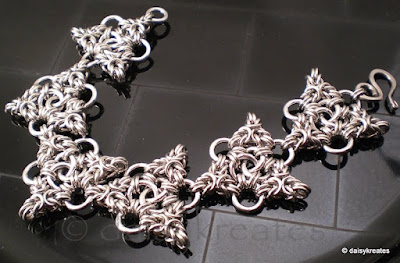
Based on Scott David Plumlee's ingenious design of Tripoli Triangle, six of the Tripoli Triangle units are simply connected end to end.  I tried out a few other ways to link them up; in the end, I chose the easiest one; no muss, no fuss; nothing to distract attention from the intricate, lacy design of each little triangle.


The lovely bracelet shows off the unique combination of Byzantine and Mobius, the two ever popular chainmaille weaves.  With every movement of the wrist, each tiny jump ring of the Tripoli points reflects the light in all directions, giving a soft sparkle that's the trade mark of Byzantine weave.


Each of the six Tripoli Triangles is an equilateral triangle measuring 1 1/8 inches on each side.  The total length of the bracelet, including the handcrafted heart clasp in natural niobium, is 7 1/2 inches, with a thin profile at 3/16th of an inch.  All jump rings are bright aluminum for light weight and no maintenance required.


/


November 23, 2010

The Kimiko Sisters


Asynchronous Orbits Earrings


Cute and fun!  My Asynchronous Orbits Earrings are one of a kind; well, for now, until I get my hands on some more anodized niobium rings and a few pairs of big and small silver rings:-)


The earrings are a study in Mobius weave.  You get a chainammille mobius when you keep threading the next ring thru the common center of all previous rings.


Most mailler use the same size rings to construct a mobius.  This simplest form of weaving can create fantastic chains and sheets.  But I was thinking, what if the rings are not the same size, or not even the same gauge?  Can they still form mobius?  If so, what would it look like?  It's often this kind of thinking that gets me in trouble; or in this case, stumble into an intriguing pattern.


Not obvious at the first glance, the silver rings may look like stylized rose buds.  Since these are earrings, those who are wondering can't easily see close enough to dissect the weave.  Unless they look real close; but then, like my beading teacher Liz Smith said, "If you're going to look that close, you'd better be buying me dinner first!"


Specs:


Anodized niobium rings from C&T Designs, WD 1.0mm, ID 3.4mm.  Sterling silver rings are spares from Spiderchain's Serpentine necklace kit, WD 1.6mm for the big one, 1.2mm for the smaller ones.  The actual ID doesn't matter much here; the key is they must not be the same sizes while they're not too far apart either to maintain a mobius' center.

November 22, 2010

Kimiko Necklace


Kimiko, name of a lovely little lady in a lovely little city in a lovely little colony.  Yep, if you're a die hard BSG fan like me, you'd know what I'm talking about:-)


In case you're not, I won't hold it against you, just maybe a little sad that you missed out on the best story ever on TV...


OK, anyway, let's start over.


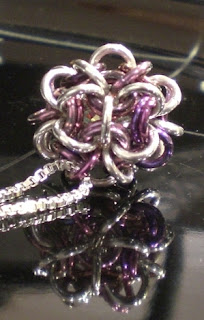
Kimiko is a lovely little pendant, in all shades of fuchsia strung on a lovely little sterling silver chain.  Done in Japanese weave pattern, this sphere shape is also known as Japanese Dodecahedron 5-in-2.  Its large inner chamber is perfect for a little hidden treasure, such as a clear Swarovski® crystal that, when light passes through it, sends out sparkles of pink, violet, and purple. Additionally, I mixed in a few sterling silver rings on the surface of the sphere, to echo the sterling venetian box chain.  This is one lovely little trinket you'll want to see and be mesmerized every time you wear it!


Specs:


Anodized niobium rings in fuchsia mix, WD 1.0mm, ID 3.4mm from C&T Designs.  Sterling silver rings are also 1.0mm, ID 3.2mm, hand cut by me with my trusty jeweler's saw.  Inside the sphere is an 8mm Swarovski® crystal, faceted rondelle (5040) in clear 2xAB.  The chain is a US-made, 24", 1.2mm venetian box chain.


Thank you for stopping by. See you again soon!


p.s. Just in case you're still wondering what I was babbling about BSG: I'm designing a line of BSG inspired jewelry.  I was fascinated by the storyline and
totally enjoyed watching the entire show.
These jewelry pieces are not endorsed by anyone related to BSG, and are
not intended to infringe upon any of BSG rights. I'm an admirer,
showing appreciation for the best TV program EVER! If any official BSG
representative feels otherwise, please let me know; the last thing I
want from this line is to upset the BSG creation.


So, starting from the pilot (see "Are You Alive?"), with each episode, I create a piece of daisykreates-original handmade jewelry with inspirations taken from the name of the episode, a line in the episode, a scene, an act, or whatever.  The Kimiko necklace is a tribute to the little satellite from "Water" of Season 1, where Boomer found the precious, although frozen, water hidden deep in layers of ice.  Crashdown named the satellite "Kimiko, after a lovely little lady in a lovely little city in a lovely little colony!"  Now you know:-)

October 7, 2010

Three Amigos

Bracelet, finger ring, and pendant.

All made in double Vipera Berus (VB) pattern, plus a Vipera Star toggle ring.  The thought of so many "vipers" in one place is not my thing, but while in chainmaille, they make for wonderful chunky jewelry.

Vipera Berus is a very "weave-like" pattern, specially when done in double, they have very interesting flow.  When I look at it, my eyes just want to follow the rings, like they're just one long strand from beginning to end, which we know are not, but don't they look like they were?

Anyway, I made the small donut a while back (check it out here) and I've been wearing it as a pendant off a simple black leather choker necklace.  Had always wanted to make a collection out of it just because I like the pattern so much.  Lucky me that Maillers Worldwide has VB as the September 2010 weave challenge; I took the opportunity to make a bracelet and a finger ring.

Now, if you can hold one of these guys in your hand, you'll feel how thick they are.  Most bracelet clasps would look wimpy for such a big boy.  To fashion something of similar thickness, I dug thru MAIL and found Vipera Star.  After a few experiments, this is the latest version.  Not sure if I'm totally happy with it, but it's a start and I can see potentials in other similar applications.  So, it's all good in the end:-)

Specs:

The finger ring (however unpractical) is niobium (Nb), WD 1.2mm, ID 6.4mm; the bracelet is bright aluminum (BA), WD 1.2mm, ID 4.18mm.  As to the Vipera Star toggle, I didn't write down the ring sizes, and I'm not about to take it apart to measure them now.  So next time, when I make another one, I'll have to remember to grab a pen and paper...

More photos here.

Très GSG


I name this one "Très GSG", because a typical GSG has 2 rows, this has 3 rows, so "very" GSG:-).   I know, the earrings look diamond-shaped, but they are none the less still GSG 3-by-3.

This set is a long way coming.  It's designed and made specifically for my dear friend Milly, who likes the colors of my Technicolor Bumble Bees bracelet, but wants a pattern bit more dense, about 3/4" wide, and suitable for daily wear.

Knowing our "day job" tends to require much time at the keyboard and frequent trips thru airport check points, I ruled out any rope or chunky pattern.  And it needs to be flexible, definitely flat in profile, enough weight so that you'll notice in case it's off the wrist, but not too much that you're constantly reminded of it being there.  Right, so that ruled out Dragonscale also.

After much net-surfing, I eventually decided to go with the vertical pattern of Half Persian 3-in-1 Sheet 6, which is essentially GSG.  Come to think of it, I suppose this is more of a GSG 3-columns, than 3-rows?  Anyway, the main body of bracelet and earrings was straight forward to weave, but the whole set took me a while to fit all the details together.  The fish toggle is one of a dozen incarnations before I settle on this version.  Nope, there is no religious connotations, at least I wasn't thinking of or planning on any such thing. I just prefer the double twist at the fish tail which matches the GSG pattern.  The wave toggle bar fits nicely with the fish motif; when the wave bar is perpendicular (to the fish body), it looks like a fish resting among sea weeds; when it's parallel, the fish is swimming in water.  OK, that's my story, and I'm sticking to it:-)

Specs:

Bracelet: All niobium (Nb) rings from TRL, WD 1.2mm, ID 6.6mm, except for rings at clasp points are 1.2mm, ID 3.83mm.  Toggle is handmade in 1.6mm full-hard Nb wire.  Bracelet width is just under 3/4"; total length is 7 1/2" while clasped on.

Earrings: Rings are grade 5 titanium (Ti) also from TRL, WD 1.2mm, ID 6.2mm. I switched to Ti rings for earrings because they are much lighter than Nb, easier on ears.  Ear wires are handmade from 1.0mm Nb wire, dotted with green AB seed beads.


The whole set was put together while in Nb's natural color, then anodized after all assembled. Here's what the bracelet looked like before the color bath.  A subtle, understated, almost hematite kind of color.  Not bad, huh?  I really liked it.  My SIL said, out of all the metal colors she'd seen so far, this is by far her favorite.  Yep, same here.  Maybe I'll make another one and leave it in its natural dark gray...

Interesting note on the earrings, the grade 5 Ti rings are anodized without chemical etching, so the colors are more muted than the Nb ear wires or the bracelet.  Nothing that affects the final appearance, just a fun fact, for geeks like me:-)

July 17, 2010

One Night at Denny's

This little guy begs for attention! Not only bursting with colors, but jingling like crazy too!

Yep, that's the name of the weave, One Night at Denny's. No clue how it came about, but sure is fun to make. I think the half-, semi-Trizantine knots look like little pots of flowers, see them?

I named this bracelet "One very jingly Night at Denny's" because it's crazily jingly. These bells are small, but high decibel. Too much for you? Well then take a look at the "light" version and the "quiet" version in here.

Specs:

All rings are 18 SWG, 1.2mm, from Blue Buddha's sample packs; they're great! I get so much use out of them. The big connector rings are bronze; "flower pots" are anodized aluminum, AR 4.1; bells are connected "Shaggy Loops" style with jeweler's brass rings. I don't know what material the bells are, just that they jingle all right.

And last but not least, the split tail Fish Hook is my own design, out of 16 SWG Nb wire, hand forged then anodized.

__

July 15, 2010

Bath Time!!

Ducky and Bubbles! Bring back fond memories of childhood, don't they?

Bubbles weave is simple, fun, and quick to work up. If you can connect jump rings, you can do this. Just like many other basic weaves, this opens up lots of room for playing with variations, such as colors!

Speaking of colors, my camera is not doing justice to the beautiful colors of anodized Niobium rings. You really want to see these in person. Brilliant, mesmerizing, colors of rainbow, puts a smile on every face:-)

Specs:

Almost the same as Jellybean Barrels, large rings are Niobium, 18 gauge, WD 1.2 mm, AR 5.5; smaller rings are stainless steel from the sample pack of base metal rings of Blue Buddha; and the clasp is hand-forged and anodized by none others than yours truly out of 16 gauge natural Nb wire from TRL.

How about some more photos? Yeah? Click here!

__

Jellybeans on Parade! Barrels of them:-)

Yep, that's the name of this weave, Jellybean Barrels! Or, to be exact, it's the Barrels version of Jellybean On Parade. Talk about boat loads of fun, isn't it? Just the name along puts everyone in a party mood:-) btw, this weave is aka Crow Chain; um, I'll stay with the parade for now:-)

OK, specs:

The inner 2x2 chain is 18 gauge, WD 1.2 mm, ID 6.6 mm, AR 5.5, stainless steel rings from C&T Designs; orbitals are same size Niobium rings from TRL; sterling silver toggle bought at San Gabriel Bead Company.

Check out more pix here.