December 2, 2013

Solar Eclipse Bracelet in Stainless Steel


Solar Eclipse is a weave I've wanted to make since back in 2010 when I first saw it on MWW.


Such a clever pattern, pleasant simplicity, and lots and lots of options when it comes ring sizes to use.


In choosing the big rings for this bracelet, I did go one size larger than what's in the weave description on MAIL.  And for this reason, I picked stainless steel which will offer a stable shape and firm hold on the kerf closures.


Speaking of closure, I did fuss over what type, what material, what shape, ... etc, etc.  Felt like the closure selection took longer than making the whole bracelet... oy!

As you can see, I finally settled on a simple, handmade (to be specific, "my hand", that is:-)) niobium toggle bar.  I think closures are just as important, if not more, as the main part of the jewelry.  They should take a stand on either being part of the overall presentation, or be the focal point.  In either case, it should not be an after thought; or in this case, I did think about it after I finished the chain, but to my defense, lots of thoughts were put into the final decision to make sure the bracelet looks good and wears well!!


For you DIYers who'd like to try their hands on this, here are my stats for this Solar Eclipse: 16swg, 7/16", 5/16", and 18swg, 3/16", all stainless steel, all saw cut.

Like this a lot but don't feel like DIY?  This bracelet is available for purchase thru my online studio DaisyKreates.com.  Hope to see you there!!

@-=@-=@-=@

...

November 17, 2013

Another Squarish-Looking Hanging Thingy


Yes, that's the little brother of my first Japanese 8 in 2 Captive 1 (J8in2C1) in blue fade.

This time, I used anodized aluminum (AA) rings with bright aluminum (BA) as captives.  Same general specs as last one, but the aspect ratios (AR's) are slightly different.

Several things to keep in mind when switching materials:

1.  The wire diameter (WD) can vary from vendor to vendor, even from batch to batch depending on when the rings were acquired.

2.  The WD of AA can be very, very different depending on the colors; yes, even from the same vendor, the same batch; this happens to even the best vendors.  My guess is it has to do with the anodizing process of aluminum, how much of the material is eaten away in order for the different pigments to enter and adhere to the voids in the metal.

3.  Well, this one you maillers out there all know already, the inside diameter (ID) changes greatly from metal to metal; the harder temper ones have greater spring back, giving bigger ID, therefore, bigger AR; and this really throws up the overall structures!!

4.  At the beginning of these shapes, the captive rings tend to pop out when I'm not looking.  Felt like I was constantly running after that escaped ring for both of these projects...  I'd imagine it may help by adding a piece of thin gauge wire to temporarily hold the first few squares together, kind of like using a piece of wire to start those pesky Half Persian weaves.


5.  At last, but not least, the whole square will get tighter and tighter as you go.  Much like many other chainmaille sculptures, the last few rings can make the toughest guys cry....  Well, not me!!  I cheated a little by slightly folding the square to make the last few connections, sort of like "folding the space", ya know;-)  Hee hee, does this sound geeky?  But you get what I mean:-)


Any how, the results are very satisfying!  I think I'll make a few more of these, maybe one in each color!

Yay!!!

...

November 12, 2013

Holiday Trinket 2013 in Japanese 8 in 2 Captive 1


Yes, I know the closures on this are rather embarrassing, but I'm so very happy that I finally, finally, (wait, wait for this....) learn how to read "Maillese", that's if that is a word, or a language:-)

Japanese 8 in 2 Captive 1 is a weave that I had wanted to do almost from day one when I started mailling, because ....  well, it looked easy enough, and yet so pretty.

Well, that was over 4 years ago.  I tried many times; none worked; googled all over; no samples.  The most recent attempt was about 6 months ago; failed.  I gave up.

Then, I saw this discussion by CMB on MAIL.  OMG!!  What can I say?  If only I learned how to "read"!  I totally misunderstood what the "Captive" means......  so sad:-(

OK, so this is what I made last night; a shameless copy of Zlosk's weave entry, along with my WIP photos.


et, voila!


It's looking so, so pretty!!  And feels nice too with the weight of the stainless steel and bronze rings in a very rigid form.

Specs are exactly as what CMB said in the discussion thread: stainless steel 18 swg, 3/16" and bronze 18 swg, 1/4".  But I think I made the mistakes in using saw cut rings, which looked to be little smaller AR than the machine cut rings.  I absolutely did not "mind the gaps", LOL!!

These sure make very pretty holiday trinkets, don't you think? :-)

btw, I also made a little sibling for this trinket; wanna see?  Come over here.

More pix?  Please visit my Picasa web album.

#
#  #
#    #
#  #
#

...

October 31, 2013

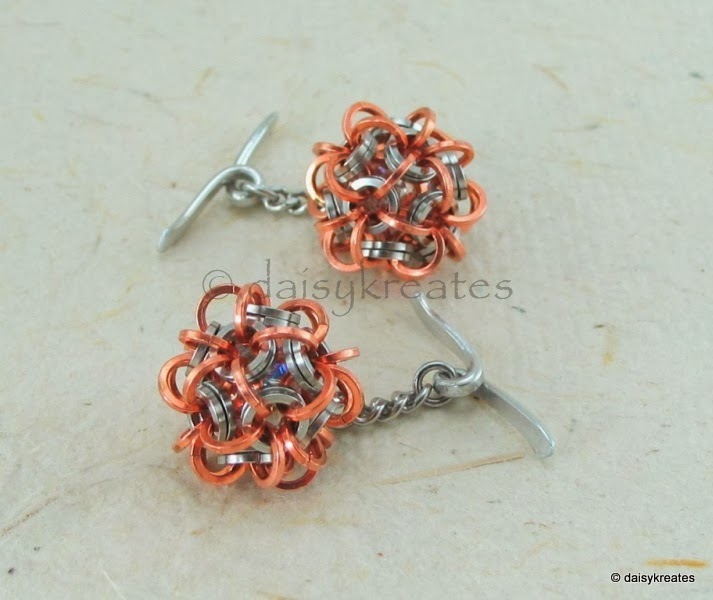
Japanese Dodecaheron Chainmaille Cufflinks


I've been wanting to make these cuff links for a while.... ever since I saw the beautiful cuff links by Corvus in sterling silver.  Very inspired!!

So I thought, what can I do to give my cuff links a little something extra, something to set them apart from the traditional style, like this?


Well, I didn't come up with much... it's hard to improve upon perfection, which the Japanese Dodcahedron is as far as sphere shape goes.  As you can see, and I hope you agree, the little spunky cuff link is already beyond adorable.

So, if there's not much I can add in the front, how about the back, huh?


I'm a big fan of tassels:-)  Anything that swings, moves, with some sparkles, something shiny!

I like these the best in that the tassels are optional.  You can wear the cuff links with or without the tassels.  Yes, I'm all for having options:-)

Traditional.


Or.... a little extra!!


Your choice!!

These lovely cufflinks are now available in my online studio DaisyKreates.com.  Hope you'll come by for a visit.

As for you DIYers out there, I used the fabulous square wire rings 20-C from C and T Designs for the Japanese balls, with a 6 mm Swarovski #5040 inside to plump it up.  Now you know:-)

Thank you for stopping by my blog!  Would love to hear from ya!!

....

October 24, 2013

Celtic Rose Sheet Bracelet in Hexagonal Tessellation


I just realized that I've not recorded my Celtic Rose Hex Sheet bracelet in my blog yet!  Guess I was too excited (and exhausted) when I finally got done with it:-)


I made this for one of the 2012 weave challenges on MWW, which I really enjoyed immensely.  Not that I made it through every one of them, but I did try my best, and I learned quite a bit.


So, this lacy little weave, Celtic Rose Sheet Hexagonal Tessellation, wasn't too difficult to make.  The key is to understand where the connection points are from one "rose unit" to the next.  I'm a bit more "free" when it comes to the ring sizes, I noticed that so long as I can fit the small ring just inside of a medium ring, the rest was more or less "negotiable".  It may also helped when I gave up on actually making a sheet which could be more daunting than a straight bracelet form, more or less:-)


btw, this is not exactly my first try at the weave.  Below is my first try:


I actually like this color contrasts better, a more distinct, tri-color look; but the large copper rings are wee bit too large, making the units a little floppy; also with copper rings at such high AR, they are kind of weak, and that is not a good thing.....

Comparing to the final ring combination here:


So much more better, right?  Hee hee:-)


And it lays nicely on the wrist with a low profile, very form-fitting, closes with a handmade toggle bar connecting to the last rose unit on the other end of the bracelet, making the whole thing almost seamless.


In case anyone is interested, here's what I used: JB 18swg 5/16", Bronze 18swg 7/32", BA 19swg 5/32".

Or, skip the DIY steps, just come over to my online studio DaisyKreates.com and pick this one up for yourself, or your loved one!  Easy, peasy:-)  In case of sold-out and you'd still like one made by me, please drop me a note for a custom made piece just for you :-)


:*:*:*:

October 21, 2013

One More Night at Denny's


Ha ha ha, yup, one more of these pretty little bracelets, One Night at Denny's!


This one is for my dear friend Margaret's mom's upcoming birthday celebration.


Selected by Margaret's two boys, the original version was a rather jingly one, with lots of bells, and it went to my friend Sara.  Now Sara is always ready for her next belly dancing party:-)


Margaret likes this bracelet for her mom with beads instead of bells.  Equally colorful and eye-catching, but much more quiet....


What do you think?  Comments/critiques welcome!!

I think I will make another one, this time with rings more inline with BrassAnvil's original specs on M.A.I.L., I like the contrasts between the different gauges of rings, and the way it gladly welcomes any beads, bells, charms, dangles, etc. along with the fun!!

...

September 30, 2013

Ninja Star Hair Barrette


I've always like dangles in hair accessories, except there are not a whole lot of these out in the market.  So I set out to make one:-)


Borrowing the idea of my Ninja Star scale flower, I pick red and white for the color combo, then added lots of Swarovski crystals to end of the tassels.


The 1-inch French made aluminum barrette is dainty and smooth, perfect for gathering just a small section of your hair at the back or on the side.


Pretty cool, huh?!

Come check out the complete line of my Ninja Star creations at my online Picasa Web Album.

Want to take home this hair barrette?  This item is will be available soon in my online shop DaisyKreates.com.  Don't want to wait?  Send me a note to arrange for a custom listing.


*
||||
;;;;

...

September 24, 2013

Three Genies


In classic color schemes, "I Dream of Jeannie" style.


Tracing back to my last year's design, adding pops of gold and champagne, these three genie bottles are perfect accessories for any LBD:-)


Or, how about a black, silver, and gold combination?  With a 30-inch long, stainless steel curb chain, these necklace slide on/off effortlessly, no clasp, no fuss!


Thank you for visiting!  More views available on my Google Photos album.  Hope to see you there too!

.
V
<>
((()))
::
;;
;

...

September 9, 2013

Lorenz's Forget-Me-Not Necklace


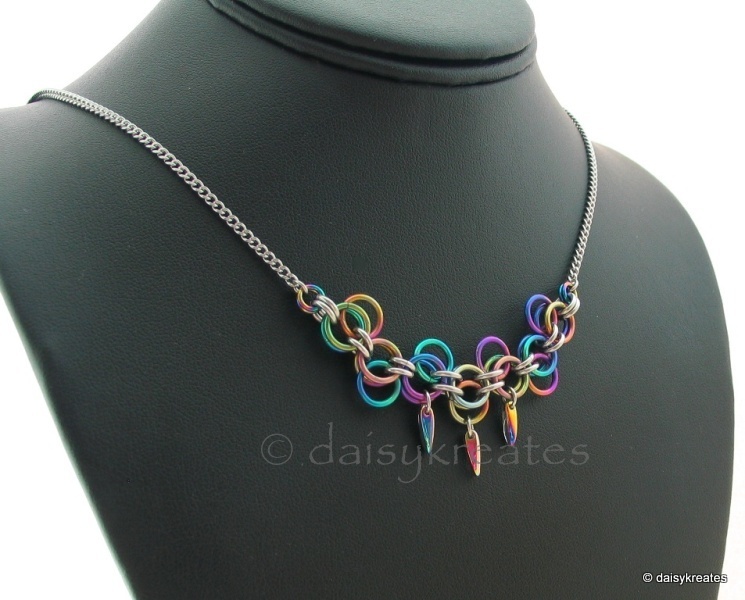
When I was making the Forget-Me-Not earrings for my dear friend Kathy, I was hoping I'll make a matching necklace so they can go together as a set, like the first set I made years back.  Should be quick and easy, right?  cuz I've done it once already, and I have enough niobium rings anodized in all colors of the interference spectrum.  Let's get started!

Well, then the "what-if" side of me took over (again), and I wanted an update for this set, something still the straight forward Forget-Me-Not weave, but with a spin.


 First of all, I set the little "falling petal" ring back to the upright position, as opposed to the downward direction in my previous set.  Then I thought the focal design of necklace just looked better when it's on opposite direction facing each other.


That worked out well, except for the center triplet.....

Several go-arounds on finding the right size rings, some trial and error, flip up and flip down, dangles or no dangle ....  Long story short, this is the final look.


A short 16" choker style necklace, which is not my kind of necklace.  Added a 2" extension at the back makes it an 18"; much better!  Flexibility is a good thing:-)


Speaking of flexibility, the center beads are AB coasted on one side only, i.e., the other side is clear with a foiled-back, silver sparkly look.  So, wear it on the "top side" of the "flip side", your choice!  Bit unexpected bonus, cool!


I'm rather pleased with the final look.  A simple structure, classic symmetry, pops of colors, shiny but not noisy.  It all ends well!

This necklace is available for custom order thru my online studio DaisyKreates.com.  Just drop me a note via the Contact form on right!

More photos?  Please visit my Picasa web album!

Ooo oOo ooO
!    !    !
...

September 4, 2013

Lorenz's Forget-Me-Not Earrings

Made these earrings as a special order for my dear friend Kathy, who already bought a pair of these for herself earlier this year; now getting another pair for her sister.


I'm so glad I have the opportunity to come back to this weave after more than two years ago when I first learned it.  So simple, so cute!  Lots of ways to expand on these.   


Compared to the original weave, I'm hanging these upside down, seems more natural this way for earrings.


One of these days, I'll make a pair with the petals going the right way, upward, that is:-)


Incidentally, I hand saw these niobium rings with a 4/o saw blade.  I wasn't too sure if these blades will work on 17 swg coils; the wire is 1.31 mm.  Well, as you can see, it did work, not very difficult at all.

Couple of things worth noting:

1. I used Rio Grande's Burr Life liberally on the blade, and it cuts much better than all my previously improvised lubricants.  Burr Life, good stuff to have.

2. Niobium gets warm rather quickly when worked on, this includes when being forged and being cut.  I could feel the temperature warming up thru the masking tape around the coil....


It's always a good day when I learn something new:-)

   
....